CROWNSEAM®MATERIALS &
MAKING

Printing guide

Apparel printing techniques: choose the right process and finish

Compare sublimation, screen printing, DTG, DTF, vinyl, puff, high-density, silicone, reflective and specialist effects for sportswear and streetwear.

Crownseam editorial guide · Reviewed 15 October 2026

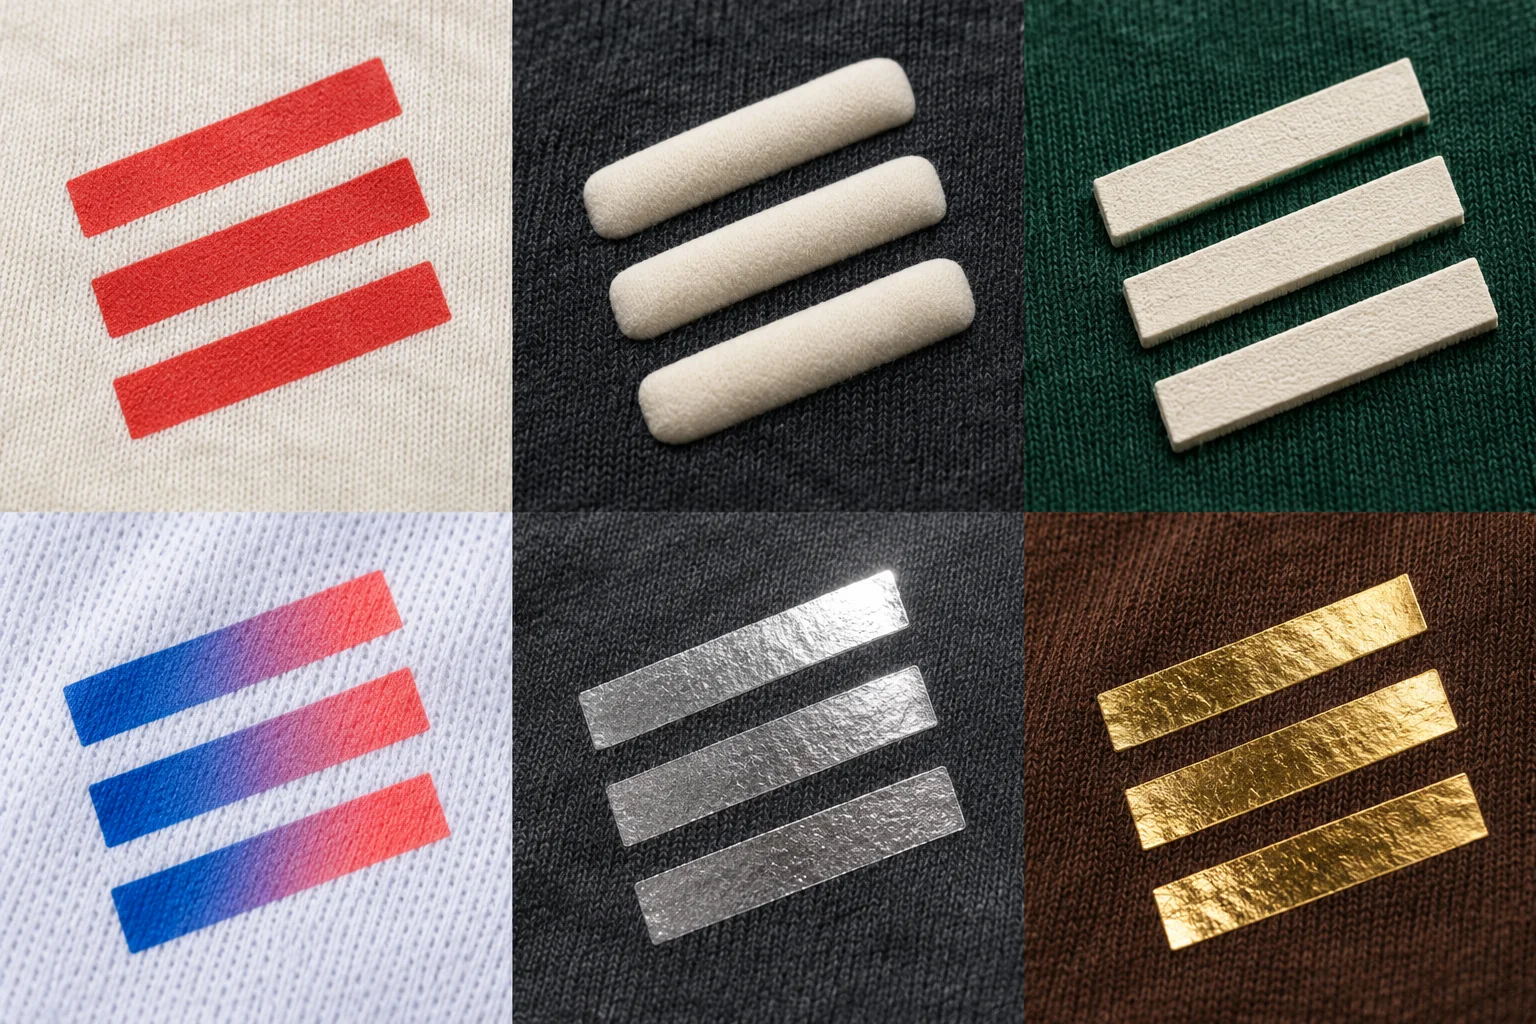
Illustrative textile and surface details for printing techniques
AI-generated material study · approve actual fabric and decoration samples
In this guide

A good print begins with the garment: fibre, fabric colour, stretch, surface and intended use. Then choose the artwork, placement and finish. This guide separates printing processes from special effects so you can ask for the result you actually want.

Sublimation, screen printing and digital transfers describe how a design reaches the fabric. Puff, gel, glitter and many '3D' finishes describe how a selected print looks or feels. The references below explain options; the exact fabric, ink and production sample still decide suitability.

COMPARE THE APPEARANCE

See what changes.

Flat matte print
Rounded puff relief
Sharp high-density relief
Sublimated colour appearance
Silver transfer appearance
Gold foil appearance

AI-generated illustrations, not Crownseam production samples. Texture and relief are illustrative. A photograph cannot prove a process, reflectivity or performance; approve a physical sample of your exact combination.

THE TECHNIQUE LIBRARY

Choose the effect.
Understand the trade-offs.

Explore 24 techniques and options. Compare up to three, then include your shortlist in an email.

24 techniques shown

Digital process

Dye sublimation

Heat transfers dye into suitable polyester fibres, rather than adding a raised ink layer.

Suitable starting point
White or light-coloured polyester jerseys, shorts and coordinated sports panels.
Why choose it
Full-colour graphics, gradients and names can share the same smooth print.
Design, limitations & sample checks

Limitations: No white ink. Cotton and dark fabric do not behave like white polyester; blended fibres can produce a different result.

Design it well: Build artwork on the supplied panel templates and include bleed beyond cut lines.

Approve on the sample: Approve colour on the actual fabric, plus seam alignment and stretched appearance.

References: Epson: dye-sublimation material guidance ↗

Ask about this technique ↗

Screen-print ink system

Plastisol screen print

Ink is pushed through a stencil and cured to form the graphic.

Suitable starting point
Bold logos and graphic tees; an appropriate formulation is needed for each fibre.
Why choose it
Strong spot-colour coverage, including a suitable underbase on dark garments.
Design, limitations & sample checks

Limitations: Ink coverage changes hand feel. A cotton formulation is not automatically suitable for polyester.

Design it well: Supply clean colour separations; agree fine-line and open-gap limits for the chosen screen setup.

Approve on the sample: Check cure, adhesion, hand feel and colour against the approved strike-off.

References: Avient: QCM plastisol ink systems ↗

Ask about this technique ↗

Screen-print ink system

Water-based screen print

A water-based formulation carries colour through a screen; soft-base and high-solids versions produce different finishes.

Suitable starting point
Cotton tees and cotton-faced sweatshirts, subject to the selected ink.
Why choose it
Useful for a softer printed feel or a matte look.
Design, limitations & sample checks

Limitations: Water-based does not automatically mean chemical-free, sustainable or suitable for every fabric.

Design it well: Choose between a subtle soft print and stronger opacity before artwork is separated.

Approve on the sample: Review colour, opacity and feel on the real garment rather than judging a digital mockup.

References: MagnaColours: water-based ink categories ↗

Ask about this technique ↗

Screen-print ink system

Discharge screen print

A compatible discharge system alters the garment dye in the printed area, with colour added when required.

Suitable starting point
Dischargeable cotton or approved cotton blends.
Why choose it
Can create a soft graphic on a dark base.
Design, limitations & sample checks

Limitations: Not every dye discharges evenly; mixed fibres and garment batches can react differently.

Design it well: Approve the base shade revealed by discharge before expecting an exact artwork colour.

Approve on the sample: Test the exact dyed fabric batch and approve the resulting colour and feel.

References: MagnaColours: discharge system and fabric compatibility ↗

Ask about this technique ↗

Digital process

DTG: direct to garment

A textile inkjet prints directly onto the garment.

Suitable starting point
Detailed artwork and tonal graphics, especially on a compatible smooth cotton surface.
Why choose it
Handles multicolour illustrations without cutting separate coloured films.
Design, limitations & sample checks

Limitations: Pretreatment, white ink, fibre and garment surface affect the result; polyester needs an appropriate system.

Design it well: Provide a clean, high-resolution image at final print size, with intentional transparent areas.

Approve on the sample: Check pretreatment marks, fine detail, dark-garment opacity and cured print feel.

References: Epson: DTG and DTFilm overview ↗

Ask about this technique ↗

Digital transfer process

DTF: direct to film

Artwork is printed onto transfer film, combined with hot-melt adhesive and heat-applied.

Suitable starting point
Multicolour logos on a wider range of compatible garment surfaces.
Why choose it
Useful for detailed designs and small personalised artwork.
Design, limitations & sample checks

Limitations: The applied graphic has a surface feel; heat, coatings and stretch still require testing.

Design it well: Remove accidental background pixels and agree the smallest printable isolated detail.

Approve on the sample: Check edge adhesion, stretch, fabric marking and dye migration on the actual garment.

References: Epson: digital transfer film process ↗

Ask about this technique ↗

Cut or printed film

Heat-transfer vinyl: HTV

A textile transfer film is cut or printed, then heat-applied.

Suitable starting point
Names, numbers, simple logos and selected specialist finishes.
Why choose it
Clear shapes with controlled colour and finish.
Design, limitations & sample checks

Limitations: Different films have different fabric compatibility, stretch and layering limits.

Design it well: Use vector paths for cut film, avoid tiny islands, and confirm whether layered colours are permitted.

Approve on the sample: Test press marks, edges and movement on the selected fabric.

References: Siser: textile transfer-film types ↗

Ask about this technique ↗

Transfer process

Screen-printed transfers

Screen-printed ink is prepared on a release carrier and later applied to the garment.

Suitable starting point
Spot-colour graphics and repeat logos on compatible cotton, blends or selected polyester.
Why choose it
Offers a screen-print appearance through a transfer workflow.
Design, limitations & sample checks

Limitations: Transfer type must match the fabric; standard and stretch-polyester products are not interchangeable.

Design it well: Prepare spot-colour artwork with suitable line widths and clear spaces.

Approve on the sample: Approve carrier registration, application and the completed garment.

References: Transfer Express: screen-transfer artwork and fabric guidance ↗Transfer Express: how screen-printed transfers are made ↗

Ask about this technique ↗

Raised screen-print effect

Puff print

An expanding ink or additive creates a rounded, raised surface during curing.

Suitable starting point
Bold lettering and selected areas on tees and sweatshirts.
Why choose it
Adds soft-looking relief that is visible at normal viewing distance.
Design, limitations & sample checks

Limitations: Expansion can soften detail and alter colour; it is not embroidered thread.

Design it well: Use broad strokes, generous gaps and a separate puff layer.

Approve on the sample: Approve the finished expansion, edge shape and shade after curing.

References: Avient: puff additive technical bulletin ↗

Ask about this technique ↗

Raised screen-print effect

High-density print

A controlled thick stencil and ink deposit build a more defined raised shape.

Suitable starting point
Geometric logos, linework and structured streetwear graphics.
Why choose it
Sharper relief can give a different character from rounded puff.
Design, limitations & sample checks

Limitations: Height and detail depend on ink, screen and fabric; some versions feel firm.

Design it well: Specify the areas to raise and approve the profile, not just a flat rendering.

Approve on the sample: Check edge definition, flexing, adhesion and the desired hand feel.

References: Avient: high-density Sculpture Base technical bulletin ↗

Ask about this technique ↗

Specialist screen-print ink system

Silicone print

A compatible silicone ink system can create a smooth, flexible surface, including raised effects.

Suitable starting point
Stretch sports fabrics and technical logos where the formulation is suitable.
Why choose it
A soft elastic feel with options for matte, gloss or relief.
Design, limitations & sample checks

Limitations: Silicone is not silicon. Surface finishes and dye-blocking requirements must be checked separately.

Design it well: Use clean shapes and specify the desired height, finish and movement.

Approve on the sample: Test the actual fabric, adhesion, stretch recovery and delayed dye migration.

References: Avient: silicone ink systems ↗

Ask about this technique ↗

Textured screen-print effect

Suede-effect print

A specialist ink gives the printed surface a soft, suede-like character.

Suitable starting point
Tonal chest logos and tactile streetwear graphics.
Why choose it
Provides texture without a sewn patch.
Design, limitations & sample checks

Limitations: It is a printed effect rather than genuine suede; curing affects the texture.

Design it well: Keep the graphic clear enough to retain its shape after the texture develops.

Approve on the sample: Approve touch, relief, shade and edge detail in a physical sample.

References: Avient: suede-effect technical bulletin ↗

Ask about this technique ↗

Special-effect ink or artwork treatment

Crackle and distressed print

A distressed look can be drawn into the artwork or created with an intentionally cracking ink system.

Suitable starting point
Vintage-style tees and faded graphic sweatshirts.
Why choose it
Creates a worn graphic while keeping the intended composition.
Design, limitations & sample checks

Limitations: Printed distress and physical cracking are different; random cracking is not suitable for tiny text.

Design it well: Mark exactly which areas should break up and retain readable brand lettering.

Approve on the sample: Agree an acceptable variation range and inspect the cured finish.

References: Avient: special-effect texture families ↗

Ask about this technique ↗

Screen-print surface effect

Gel and high-gloss print

A clear or coloured specialist ink creates a glossy, gel-like surface.

Suitable starting point
Small accents, droplets, glossy lettering and layered graphic details.
Why choose it
Adds reflected light and depth against matte fabric.
Design, limitations & sample checks

Limitations: A larger solid area changes the feel; gloss and tack vary by formulation.

Design it well: Separate glossy areas from the base print and specify whether they should be raised.

Approve on the sample: Inspect gloss, surface feel, registration and flexing.

References: Avient: gel clear technical bulletin ↗

Ask about this technique ↗

Adhesive and foil finish

Foil transfer effect

Textile foil bonds to a prepared adhesive design to create a bright metallic surface.

Suitable starting point
Selected lettering, badges and small statement graphics.
Why choose it
A mirror-like finish distinct from ordinary printed gold.
Design, limitations & sample checks

Limitations: Coverage, texture and compatibility depend on adhesive, foil and fabric.

Design it well: Keep foil zones deliberate and agree solid versus distressed coverage.

Approve on the sample: Inspect bond, surface appearance and the approved garment-care route.

References: Siser: adhesive and textile foil workflow ↗

Ask about this technique ↗

Screen-print optical effect

Metallic and pearlescent ink

Special pigments create metallic shimmer or a softer pearly appearance.

Suitable starting point
Accents on logos, lettering and fashion graphics.
Why choose it
Adds lustre without needing a mirror-like foil layer.
Design, limitations & sample checks

Limitations: Metallic, pearl and glitter are different looks; screen colour alone cannot show the effect accurately.

Design it well: Provide a finish reference and reserve space around fine details.

Approve on the sample: Approve under normal lighting and at different angles.

References: MagnaColours: metallic and other water-based effects ↗

Ask about this technique ↗

Screen-print particle effect

Glitter print

A suitable print base holds visible glitter particles within the design.

Suitable starting point
Statement graphics and selected fashion accents.
Why choose it
Produces a sparkling texture under moving light.
Design, limitations & sample checks

Limitations: Particle size affects screen selection and fine detail.

Design it well: Use bold areas and separate glitter zones from small readable text.

Approve on the sample: Check texture, particle retention and the finished graphic edges.

References: MagnaColours: glitter print base ↗

Ask about this technique ↗

Fibre-surface decoration

Flock print and flock transfer

Short fibres are bonded to an adhesive design; flock transfer films offer another route.

Suitable starting point
Velvety lettering and soft, raised graphic accents.
Why choose it
A tactile fibre surface without constructing an embroidered patch.
Design, limitations & sample checks

Limitations: Flock is different from chenille embroidery; film and direct-flock systems have their own limits.

Design it well: Choose clear shapes and specify a flocked surface rather than a generic 'fuzzy' effect.

Approve on the sample: Check fibre retention, edge definition and fabric compatibility.

References: MagnaColours: electrostatic flock adhesive ↗Siser: flock transfer compatibility bulletin ↗

Ask about this technique ↗

Light-returning effect

Reflective print and transfers

Reflective inks, films or trims return light towards its source.

Suitable starting point
Running details, technical streetwear accents and reflective graphics.
Why choose it
Creates a strong lighting-dependent visual effect.
Design, limitations & sample checks

Limitations: A decorative reflector does not make the whole garment certified safety clothing.

Design it well: Specify the lighting effect, placement and any separately required performance standard.

Approve on the sample: Inspect under ordinary light and a suitable light source; assess the finished garment for its intended use.

References: 3M: how reflective materials work ↗3M: finished-garment reflective material assessment ↗

Ask about this technique ↗

Luminescent effect

Glow-in-the-dark print

A suitable glow pigment or transfer produces a visible effect after light exposure.

Suitable starting point
Novelty streetwear graphics and selected fashion details.
Why choose it
Gives artwork a second appearance in dim conditions.
Design, limitations & sample checks

Limitations: Glow is different from reflection and fluorescent colour; intensity depends on the product and exposure.

Design it well: Use generous graphic areas and specify the daylight appearance too.

Approve on the sample: Approve both charged glow and normal-light colour on a sample.

References: Avient: glow and specialist effect selection guide ↗

Ask about this technique ↗

Reactive visual effect

Photochromic colour change

A compatible ink changes appearance when exposed to UV light.

Suitable starting point
Experimental logos and reveal graphics.
Why choose it
Creates an interactive daylight effect.
Design, limitations & sample checks

Limitations: The change depends on exposure and formulation; it is a specialist sample-led choice.

Design it well: Design both the inactive and activated states so either remains intentional.

Approve on the sample: Review both states, repeat exposure and the completed garment-care proposal.

References: SFXC: photochromic textile ink ↗

Ask about this technique ↗

Applied textile paint

Spray, airbrush and stencil graphics

Textile-compatible colour is sprayed freehand or through a stencil.

Suitable starting point
Soft gradients, overspray lettering and individually varied streetwear details.
Why choose it
Allows painterly edges and controlled irregularity.
Design, limitations & sample checks

Limitations: Hand-applied work varies; ordinary household spray paint is not a substitute for a textile system.

Design it well: Show approved placement, colour spread and the amount of variation allowed.

Approve on the sample: Check colour fixation, hand feel, overspray boundaries and consistency across samples.

References: Jacquard: textile airbrush colour ↗

Ask about this technique ↗

Fabric-printing processes

Digital fabric printing: pigment or reactive

Fabric can be printed before cutting with a pigment system or a fibre-compatible dye system.

Suitable starting point
Detailed repeats and artwork on appropriate cotton, viscose and other approved fabrics.
Why choose it
Extends full-colour fabric design beyond polyester sublimation.
Design, limitations & sample checks

Limitations: Pigment and reactive printing use different fixation and finishing routes; they are not interchangeable names.

Design it well: Prepare a repeat tile or panel layout and identify the exact fibre composition.

Approve on the sample: Approve a strike-off for colour, feel and the required finishing route.

References: Mimaki: textile pigment ink ↗Mimaki: reactive textile ink ↗Mimaki: textile ink and fibre compatibility ↗

Ask about this technique ↗

Production layout, not a separate ink

All-over and cut-panel artwork

Artwork is placed across fabric or garment panels before assembly using a suitable printing method.

Suitable starting point
Sports kits, coordinated sets and full-garment patterns.
Why choose it
Allows planned graphics over several panels while protecting key logos.
Design, limitations & sample checks

Limitations: Seams, stretch and cutting tolerance affect alignment; exact continuity cannot be assumed at every seam.

Design it well: Use the factory's pattern pieces, bleed, seam allowances and size grading; keep critical text clear of seams.

Approve on the sample: Review an assembled sample from front, back and side, including movement.

References: Epson: dye-sublimation material guidance ↗Mimaki: textile ink and fibre compatibility ↗

Ask about this technique ↗

Compare your options.

Choose a starting route for your garment

Use these as starting points for a discussion, rather than a universal ranking. A physical print sample is the right place to compare the options shortlisted for your fabric.

  • White or light-coloured polyester team kit with all-over artwork: begin with sublimation and a cut-panel layout.
  • A cotton graphic tee with a few bold colours: compare screen-print ink systems.
  • Detailed artwork on a suitable cotton garment: compare DTG with a transfer sample.
  • Names and numbers: compare suitable cut film, printed transfer or the garment's original print process.
  • Raised streetwear branding: compare puff, high-density and silicone by feel, edge shape and stretch.
  • Technical stretch fabric: assess a compatible stretch system, heat sensitivity and dye migration before choosing an effect.

References: Epson: dye-sublimation material guidance ↗Epson: DTG and DTFilm overview ↗Transfer Express: screen-transfer artwork and fabric guidance ↗STAHLS': dye migration guide ↗

Puff, high-density and '3D printing' are different requests

In apparel decoration, '3D print' often means raised ink, a silicone transfer or an embroidered effect. It does not identify one manufacturing process. Puff expands into softer relief; high-density ink can form defined edges; silicone describes an ink chemistry that can support several finishes.

Show a reference image and say whether you want rounded, sharp, rubber-like, glossy, velvety or stitched relief. If you mean an actual additively manufactured object attached to a garment, discuss that as a separate development project.

  • Ask for the process name and desired finish together.
  • Compare a real sample at normal viewing distance and close up.
  • Define where the decoration must bend or stretch.

References: Avient: puff additive technical bulletin ↗Avient: high-density Sculpture Base technical bulletin ↗Avient: silicone ink systems ↗

Why sports polyester needs an extra print check

Heat can encourage dye from polyester to enter an overprinted graphic. A pale logo can become discoloured even when it initially looks correct. Fabric coatings, stretch and print coverage also affect the choice.

The appropriate low-temperature, low-bleed or blocking system depends on the actual garment. A system that works on one polyester fabric is not proof that it works on every polyester or sublimated fabric.

  • Test the actual fabric colour and batch.
  • Inspect the finished result after cooling and again after an agreed interval.
  • Check extension and recovery in the direction the garment moves.
  • Keep a matched approved sample as the production reference.

References: Avient: printing performance wear and dye migration ↗STAHLS': dye migration guide ↗

Prepare artwork around the print method

Send the best original artwork, final dimensions and a placement view. Vector paths help with clean logos and cut-film shapes; high-resolution raster art can suit digital illustration. Converting a poor image to SVG does not recreate missing detail.

Show front, back and sleeve positions separately. State whether the decoration crosses a seam, pocket, zip, rib or mesh panel. For panel printing, work from the garment pattern rather than a generic flat T-shirt picture.

  • Include colour references and make transparent areas intentional.
  • Outline fonts or supply permitted font files.
  • Keep names and numbers readable at the smallest ordered size.
  • Mark separate layers for raised ink, gloss, foil or flock.
  • Confirm sample line widths and gaps rather than using one minimum for every technique.

References: Transfer Express: screen-transfer artwork and fabric guidance ↗

Approve the finished sample before setting the care label

Review colour, touch, opacity, relief, placement and movement on the chosen garment. Large solid areas can feel different from a small logo even when the process name is identical.

The fabric, print, adhesive, wash treatment and trims must work together. Use the care route confirmed for that finished combination rather than applying one wash temperature or durability claim to every method.

  • Check the print on the actual production fabric.
  • Inspect alignment, edges and any intentional distressed effect.
  • Review the garment relaxed and in movement.
  • Confirm compatibility with any planned garment wash or dye process.

References: Siser: flock transfer compatibility bulletin ↗3M: finished-garment reflective material assessment ↗

BEFORE YOU BRIEF YOUR COLLECTION

Your questions, answered.

Which printing method is best for sportswear?

Start with fabric and use. Sublimation is a useful route for white or light-coloured polyester all-over kits. Stretch logos and names may need a compatible transfer or screen-print system. Test heat response, movement and dye migration on the actual garment.

Is puff print the same as high-density print or 3D embroidery?

No. Puff is a raised ink effect that expands. High-density printing builds more defined ink relief. 3D or puff embroidery uses thread and a supporting construction, commonly foam. A reference sample helps distinguish the finish you want.

Can you sublimate a black cotton hoodie?

Conventional dye sublimation is suited to white or light-coloured polyester and has no white ink. A black cotton hoodie usually needs another decoration route. A transfer marketed for cotton is a different surface system and should be assessed as such.

What is the difference between DTG and DTF?

DTG prints directly onto a suitable garment, with pretreatment where required. DTF prints onto film and transfers the artwork with adhesive and heat. Compare actual samples for fabric compatibility, detail, stretch and feel.

Are water-based prints always better or more sustainable?

The label alone is not enough. Water-based systems vary in opacity, feel, curing and composition. Choose a suitable product and review substantiated information for that exact system rather than assuming a broad environmental claim.

Does reflective printing make a garment safety certified?

No. A reflective decoration can provide a visual effect, but any safety claim needs the appropriate material and finished-garment assessment for the intended use. Tell us if certified visibility performance is part of your brief.

Can a design combine print, embroidery and a garment wash?

A combined finish may be possible, but the sequence and compatibility need a sample. Wash treatments can change print colour, adhesive, thread or fabric. Agree the final effect and production sequence before approving bulk work.

What should I send to get a printing recommendation?

Send the garment type, fabric composition and colour, artwork, approximate print size, placement and the look you want. Include stretch or visibility requirements and any planned wash effect. Email [email protected] if you are unsure which method to choose.

YOUR IDEA DOESN’T NEED A TECHNICAL NAME

Tell us the look.
We’ll help plan the route.

Can’t find your fabric, print, embroidery or wash? Tell us what you are making and what you want it to feel like. Add reference pictures to your email.

[email protected] ↗

Mockups and sublimation file recreation are currently free. Sample, logo redraw and size-set costs are confirmed in your quote.

Prepare my email ↗

Opens a draft in your email app. Review, attach references and send it yourself. This page does not upload your details.

KEEP PLANNING

Connect the next decision.

02

Washes & finishes

Compare garment dye, enzyme wash, acid wash, sun fade, spray effects, distressing and burnout. Learn what to specify and approve before production.

Read the guide →
03

Embroidery & patches

Compare flat, tonal, 3D puff and chenille embroidery, appliqué, tackle twill and patches. Plan artwork, backing and sample checks for your garment.

Read the guide →
04

Sportswear, from idea to kit

Choose sportswear fabrics, plan panels and artwork, and approve fit, printing and construction for team kits, training wear and fitted performance garments.

Read the guide →
05

Streetwear, from idea to collection

Plan streetwear fit, fabrics, GSM, washes, printing and embroidery, then turn the idea into a clear tech pack and an approved production sample.

Read the guide →

READ FURTHER

Technical references.

References explain processes and material principles. Supplier specifications are not a claim that Crownseam uses a particular brand, machine or certified system.